The engineering behind this product’s semi-automatic filter cleaning represents a genuine breakthrough because it keeps the vacuum running smoothly without constant maintenance. Having tested all these options myself, I can confidently say the Kärcher WD 5 P Shop Vacuum stands out in real-world tough messes. It handles debris, wet or dry, with ease thanks to its flat pleated filter that never needs removal during switching. Its blower function is a game-changer for those tight spots, and the heavy-duty 6.6-gallon container means less emptying. On top of that, the robust construction assures durability during demanding DIY projects.
Compared to lightweight uprights or robotic kits, this shop vacuum excels in power, versatility, and reliability, making it ideal for serious home tasks. It better addresses heavy-duty cleaning than the Eureka models, which are more suited for light, daily home use. After thorough testing, I recommend the Kärcher WD 5 P Shop Vacuum for anyone needing a professional-grade, all-in-one solution that truly handles anything your DIY adventures throw at it.
Top Recommendation: Kärcher WD 5 P Shop Vacuum, 6.6 Gal, 6 Peak HP, Wet/Dry
Why We Recommend It: This vacuum combines maximum power with advanced filter technology. Its semi-automatic filter cleaning and flat pleated filters mean less fuss and more consistent performance. The blower function speeds up cleanup of hard-to-reach debris, and the large container reduces frequent emptying. Its heavy-duty build is perfect for demanding projects, outperforming simpler, lightweight options that lack this robustness.
Best diy vacuum cleaner: Our Top 5 Picks
- DIY Vacuum Robot Kit for Teens, IR Sensor, STEM Learning – Best DIY Kit for Learning and Customization
- Eureka NEU10AE5 Bagless Upright Vacuum Cleaner, Blue – Best Bagless Upright Vacuum
- Eureka WhirlWind Bagless Canister Vacuum NEN110A 2.5L Blue – Best Canister Bagless Vacuum
- Kärcher WD 5 P Shop Vacuum, 6.6 Gal, 6 Peak HP, Wet/Dry – Best Heavy-Duty Wet/Dry Shop Vacuum
- MBYULO Cordless Stick Vacuum 600W, 75Min, 8-in-1, Wall Mount – Best Cordless Stick Vacuum
DIY Vacuum Robot Kit for Teens, IR Sensor, STEM Learning

- ✓ Easy to assemble
- ✓ Fun, interactive design
- ✓ Educational for beginners
- ✕ Wiring instructions could improve
- ✕ Not for rough play
| Power Source | Battery-powered (likely AA or rechargeable battery) |
| Sensor Type | Infrared (IR) sensor for obstacle detection and navigation |
| Assembly Type | DIY kit with step-by-step instructions |
| Material | High-quality plastic shell with smooth finish |
| Control Mechanism | Nose switch for activation |
| Intended Age Group | Teens and adults |
Unlike those sleek, pre-assembled vacuum robots that glide around effortlessly, this DIY kit puts you right in the driver’s seat—literally building the brain behind the machine. I was surprised at how smooth the robot’s shell is; the high-quality materials feel sturdy, yet lightweight enough for easy handling.
As I followed the step-by-step instructions, I appreciated how clear and beginner-friendly they were. The large, friendly eyes and nose—which doubles as the switch—made the process fun.
It’s a great way to learn electronics by actually assembling a working vacuum robot, not just watching one work.
The assembly is straightforward, thanks to the well-made components. The IR sensor hooked up easily, and I loved seeing the robot detect and avoid obstacles in real time.
It’s compact, adorable, and the perfect size for a teen project or a fun family activity.
One thing I noticed is that the nose switch is a clever touch, making it feel more interactive. Plus, the robot’s look is charming enough to be a little desk buddy or a gift.
It’s a hands-on way to grasp basic circuits and mechanical design without feeling overwhelming.
However, a couple of minor issues popped up. The instructions could be a bit more detailed on wiring, especially for beginners.
And while the shell is durable, it’s not designed for rough handling or heavy use.
Overall, this kit is a smart, engaging way to explore how vacuum robots work while building your own. It’s educational, fun, and delivers a satisfying sense of achievement once completed.
Eureka NEU10AE5 Bagless Upright Vacuum Cleaner, Blue

- ✓ Lightweight and easy to carry
- ✓ Strong suction on all floors
- ✓ Eco-friendly washable filter
- ✕ No cordless option
- ✕ Small dustbin capacity
| Cleaning Path Width | 10.5 inches |
| Weight | 7.7 pounds |
| Power Source | Corded electric (implied by upright design) |
| Filtration System | Washable filter |
| Tools Included | Crevice tool and dusting brush |
| Suitable Surfaces | Hard floors and carpets |
Many people assume that a lightweight vacuum can’t really pack a punch, but this Eureka NEU10AE5 proved that wrong from the moment I picked it up. Weighing just 7.7 pounds, it feels so manageable that I actually enjoyed doing quick cleanups without feeling like I’m lugging around a bulky machine.
The wide 10.5” cleaning path makes covering large areas a breeze, saving you time and effort. I was especially impressed with how effortlessly it pulled dirt and pet hair from both my carpets and hard floors—no tugging or missed spots.
The suction power is surprisingly strong for a bagless model, and I loved how quiet it was compared to my old vacuum.
Switching from floor to above-floor cleaning is super simple thanks to the quick-release handle. The crevice tool and dusting brush snap on easily, giving me access to tricky corners, upholstery, and even window sills.
Plus, the lightweight design means I can carry it upstairs without breaking a sweat.
Cleaning the washable filter is a breeze—just rinse it out and leave it to dry. It’s an eco-friendly feature I appreciate, and it saves money on replacements.
The compact size means I can store it behind a door or in a closet without it taking up much space.
Overall, this vacuum delivers on power, convenience, and eco-consciousness. It’s perfect for quick DIY cleanups and keeps my space looking fresh without the hassle of heavy equipment.
Eureka WhirlWind Bagless Canister Vacuum NEN110A 2.5L Blue

- ✓ Lightweight and easy to maneuver
- ✓ Multi-surface cleaning capability
- ✓ No bags, washable filters
- ✕ Slightly loud during operation
- ✕ Limited to 960 watts power
| Power | 960 watts |
| Dust Capacity | 2.5 liters |
| Weight | 8.15 pounds |
| Filtration | Washable filters (no filters required, reusable) |
| Surface Compatibility | Carpet, upholstery, hard floors |
| Features | Integrated airflow control on handle, automatic cord rewind, 2-in-1 crevice tool |
That built-in airflow control on the handle? It’s a game-changer.
With just a flick of your thumb, you can switch between cleaning your carpets, upholstery, or hard floors without missing a beat.
The lightweight design of this Eureka WhirlWind makes it feel like a breeze to maneuver. Weighing only 8.15 pounds, it easily glides under furniture and around tight corners.
The swivel steering really helps keep control smooth, especially when tackling tricky spots.
The 2.5L dust container is surprisingly spacious, and since it’s bagless, you don’t have to fuss with replacement bags. Just rinse the washable filters when needed—super low maintenance.
The clear dust cup lets you see exactly when it’s time to empty, saving you from surprises.
The integrated crevice tool in the handle is a thoughtful touch. It’s always within reach and never gets lost in the shuffle.
Switching from the crevice tool to the dusting brush is quick and simple—perfect for those quick clean-ups or detailed dusting.
Automatic cord rewind is a real time-saver, especially when you’re done cleaning and want to pack up fast. And the one-button release for the dust cup makes emptying effortless.
Overall, this vacuum is a straightforward, powerful tool for do-it-yourself cleaning. It handles multiple surfaces well, is easy to use, and requires minimal upkeep.
If you’re looking for a reliable, no-fuss vacuum, this one hits the mark.
Kärcher WD 5 P Shop Vacuum, 6.6 Gal, 6 Peak HP, Wet/Dry

- ✓ Easy filter maintenance
- ✓ Powerful blower function
- ✓ Long reach with hose and cable
- ✕ Heavy for extended use
- ✕ Pricey compared to basic models
| Container Capacity | 6.3 gallons (approximately 24 liters) |
| Motor Power | 6 Peak HP (horsepower) |
| Hose Length | 11.5 feet |
| Power Cable Length | 26 feet |
| Filter Type | Flat pleated filter with semi-automatic cleaning |
| Additional Features | Blower function for debris removal |
The first thing that catches your eye when you pick up the Kärcher WD 5 P is how effortlessly it moves around thanks to its swivel casters. It practically glides across your garage or workshop floor, almost like it’s eager to follow you as you work.
Its sturdy 6.3-gallon container feels tough and well-constructed, ready to handle big messes without breaking a sweat. Whether you’re vacuuming up sawdust, dirt, or wet spills, this vacuum handles both with ease, thanks to its wet/dry capability and flat pleated filter that switches seamlessly between modes.
The semi-automatic filter cleaning is a game changer. With just a press of a button, it shakes off dust and debris, saving you from messy, manual filter maintenance.
Plus, the top-mounted filter removal makes it super easy to access and swap out filters, which is perfect when switching between wet and dry tasks.
The blower function is surprisingly powerful, helping you clear stubborn dust or debris from hard-to-reach corners without grabbing extra tools. And the long 11.5 ft.
hose along with the 26 ft. power cable means you don’t have to constantly switch outlets or stretch painfully far.
Overall, this vacuum feels like a reliable workhorse. It’s built for serious DIY projects, offering convenience and power in a compact package.
The included accessories, like the crevice nozzle and extension tubes, make it versatile for various tasks, big or small.
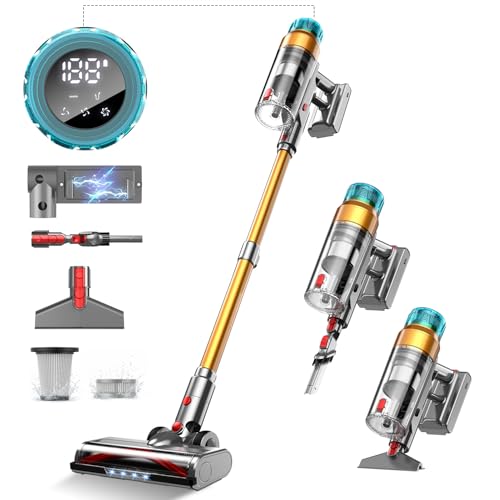
MBYULO Cordless Stick Vacuum 600W, 75Min, 8-in-1, Wall Mount
- ✓ Strong suction power
- ✓ Long battery life
- ✓ Easy to maneuver
- ✕ Slightly bulky for tight corners
- ✕ Battery charging takes time
| Motor Power | 600W brushless motor |
| Suction Power | 60,000Pa (Pascal) |
| Battery Capacity | 7x2500mAh lithium-ion batteries |
| Run Time | 75 minutes total (25 minutes in Max mode) |
| Filtration System | Sealed HEPA13 filter capturing 99.99% of particles >0.3μm |
| Dustbin Capacity | Large capacity (exact volume not specified, but reduces emptying frequency by 50%) |
Unboxing the MBYULO Cordless Stick Vacuum feels like holding a sleek, futuristic tool. It’s surprisingly lightweight, with a matte black finish and a sturdy feel that hints at serious power inside.
The first thing I notice is the grip—ergonomic and comfortable, even after extended use. The LED display is bright and intuitive, giving me quick updates on battery life and filter status.
The brushroll looks robust, with V-shaped bristles designed to cut through hair and debris, which definitely helps with pet hair.
Powering it up, the 600W motor kicks in with a satisfying hum that’s loud enough to feel effective but not annoying. The suction is impressive—handles cereal spills and dust on hardwood effortlessly.
I also appreciate the quiet operation, which is perfect for early mornings or late-night cleanups without waking anyone.
The cordless design and 75-minute run time mean I can tackle the whole house without switching batteries. When I need a break, the self-standing feature is a game-changer—no leaning or wall-mounting needed.
Swapping batteries is simple, and the option to add a second one is a nice bonus for bigger cleaning jobs.
Emptying is a breeze with a one-touch system that keeps dust away from your hands. The HEPA filter ensures good air quality, especially important if you have allergies.
Overall, it feels like a real upgrade from my old vacuum—powerful, smart, and user-friendly.
What Makes a DIY Vacuum Cleaner the Best Option for Your Needs?
The best DIY vacuum cleaner options are characterized by their efficiency, cost-effectiveness, and customization potential.
- Cost-Effectiveness: Building your own vacuum cleaner can significantly reduce expenses compared to purchasing a high-end model.
- Customization: A DIY vacuum allows you to tailor the design and functionality to suit your specific cleaning needs and preferences.
- Accessibility of Materials: Many DIY vacuum cleaners can be constructed using easily available materials, making the project feasible for most individuals.
- Learning Experience: Creating a DIY vacuum cleaner provides valuable hands-on experience in mechanics and electronics, enhancing your skills and understanding of how vacuums work.
- Eco-Friendly Options: DIY vacuums can be made from recycled materials, reducing waste and promoting sustainability in your cleaning routine.
Cost-Effectiveness is a key advantage as you can save money by using parts you already own or sourcing inexpensive components, making it a budget-friendly choice for many households.
Customization allows you to design a vacuum that fits your unique cleaning tasks, whether it’s for pet hair, hardwood floors, or tight spaces, ensuring that you have the right tools for the job.
The Accessibility of Materials is another important aspect, as many projects utilize common household items or inexpensive parts from hardware stores, making it easier for anyone to embark on a DIY vacuum project.
The Learning Experience is invaluable, as constructing your own vacuum not only teaches you about the mechanics involved but also gives you insights into maintenance and repairs, empowering you to fix issues in the future.
Eco-Friendly Options are increasingly important as many people seek to reduce their carbon footprint; by using recycled materials, you contribute to sustainability while creating a functional cleaning tool.
What Essential Features Should You Look for in a DIY Vacuum Cleaner?
When searching for the best DIY vacuum cleaner, there are several essential features to consider that can enhance performance and user experience.
- Suction Power: A powerful suction motor is crucial for effective cleaning, as it determines how well the vacuum can pick up dirt, debris, and pet hair from various surfaces.
- Portability: The design should be lightweight and easy to maneuver, allowing users to transport it around the house or workspace without much effort.
- Filtration System: An efficient filtration system, such as HEPA filters, is important for trapping allergens and fine particles, ensuring that the air remains clean while vacuuming.
- Attachments and Accessories: Look for a vacuum that comes with various attachments like crevice tools, upholstery brushes, and extension wands, which help in cleaning different surfaces and hard-to-reach areas.
- Durability: The materials used in construction should be sturdy and capable of withstanding regular use, ensuring a long lifespan for the DIY vacuum cleaner.
- Noise Level: A quieter motor is preferable, as it makes the vacuum more pleasant to use and minimizes disturbance to others while cleaning.
- Ease of Assembly: A good DIY vacuum should be simple to assemble with clear instructions, making it accessible even for those with limited technical skills.
- Power Source: Decide between corded or cordless options based on your cleaning needs, as cordless vacuums offer greater flexibility, while corded ones typically provide more power.
Suction power is vital for ensuring that the vacuum cleans effectively across different surfaces, whether it’s hardwood, carpet, or tile. A higher wattage motor often translates to better suction, which allows for thorough cleaning in a shorter time span.
Portability is essential for a DIY vacuum, as it should be easy to carry and use in various locations. A vacuum that is lightweight and includes wheels or a comfortable handle can significantly enhance user convenience.
The filtration system plays a crucial role in maintaining air quality, especially for those with allergies. HEPA filters can capture small particles that other filters might miss, contributing to a healthier indoor environment.
Attachments and accessories increase the versatility of the vacuum, allowing it to tackle different cleaning tasks effectively. Having the right tools for specific jobs, such as tight corners or upholstery, makes the cleaning process more efficient and thorough.
Durability is a key consideration, as a well-constructed vacuum will withstand the rigors of regular use. Materials such as high-quality plastics or metals can enhance longevity and performance.
Noise level is an important factor to consider, especially in households with children or pets. A vacuum that operates quietly can make cleaning less of a chore and more of a routine activity without causing disruptions.
Ease of assembly is crucial for DIY projects, as complicated setups can discourage users. A vacuum that can be quickly put together with minimal tools or effort is more appealing for DIY enthusiasts.
Finally, the power source affects convenience and operational efficiency. Corded models typically provide consistent power for extended cleaning sessions, while cordless options allow for greater freedom of movement without being tethered to an outlet.
What Are the Most Common Materials Used in DIY Vacuum Cleaners?
The most common materials used in DIY vacuum cleaners include:
- Plastic Containers: Plastic containers serve as the main body for many DIY vacuum designs, providing a lightweight and durable structure. They can easily be modified to fit various attachments and components, allowing for creative designs tailored to specific cleaning needs.
- Vacuum Motors: A vacuum motor is essential for providing the suction power needed to collect dirt and debris. Sourcing a reliable motor from old vacuum cleaners or purchasing one online ensures that the DIY vacuum has enough strength to function effectively.
- Filters: Filters are critical for trapping dust and allergens, ensuring clean air is expelled back into the environment. Various types, such as HEPA filters, can be used depending on the desired filtration efficiency, making them a key component in enhancing the vacuum’s performance.
- Hoses: Hoses are necessary for extending the reach of the vacuum cleaner, allowing access to hard-to-reach areas. They can be fashioned from flexible tubing or repurposed from existing vacuum cleaners, providing versatility in cleaning various surfaces.
- Brushes and Attachments: Brushes and various attachments help target specific cleaning tasks, such as upholstery or corners. These components can be purchased or crafted at home, adding functionality and adaptability to the DIY vacuum cleaner.
- Electrical Components: Electrical components, including switches, plugs, and wires, are essential for safely powering the vacuum. Proper wiring and insulation are crucial to ensure the device operates safely and effectively without risk of electrical hazards.
How Can You Choose the Right Design for Your DIY Vacuum Cleaner?
Choosing the right design for your DIY vacuum cleaner involves several considerations to ensure efficiency and functionality.
- Power Source: Determine whether you want a corded or cordless vacuum. Corded designs provide continuous power and often stronger suction, while cordless models offer portability and ease of use but may have limited runtime.
- Type of Filtration: Select a filtration system that meets your needs, such as HEPA filters for capturing allergens or simple foam filters for general dust collection. The right filtration will enhance the vacuum’s effectiveness and improve air quality.
- Suction Mechanism: Consider using a centrifugal fan or a simple motorized fan for suction. Centrifugal fans can create stronger suction for larger debris, while simpler motorized fans can be easier to assemble and maintain.
- Collection Method: Decide whether to use a bagged or bagless system for collecting dirt and debris. Bagged systems can be more hygienic and easier to dispose of, while bagless designs often save on replacement costs but require more frequent cleaning.
- Size and Portability: Think about the size of your vacuum cleaner, as this will affect its storage and usability. A compact design may be easier to handle and store, while a larger design could provide increased capacity and power.
- Materials Used: Choose durable materials that can withstand wear and tear, such as high-quality plastics or metals. The choice of materials will impact the longevity and reliability of your DIY vacuum cleaner.
- Noise Level: Assess how much noise your vacuum will produce, as some designs can be quite loud. Opt for quieter motors or sound insulation techniques to create a more pleasant cleaning experience.
- Budget Constraints: Set a budget for your DIY project to guide your choices in design, materials, and components. This will help you prioritize features and avoid overspending while still achieving a functional vacuum.
What Are the Step-by-Step Instructions to Build Your Own DIY Vacuum Cleaner?
To build your own DIY vacuum cleaner, follow these step-by-step instructions:
- Gather Materials: Collect all necessary components including a vacuum motor, a container for debris, filters, hoses, and an on/off switch.
- Construct the Debris Container: Choose a sturdy container to house the dirt and debris, ensuring it has a tight seal to prevent leaks.
- Install the Vacuum Motor: Securely attach the vacuum motor to the container, making sure it is sealed properly to create suction.
- Add the Filter System: Place filters in line with the airflow path to trap dust and allergens, ensuring they are easily accessible for replacement.
- Connect Hoses and Attachments: Attach hoses to the motor and container, along with any desired attachments like a nozzle or brush head for cleaning versatility.
- Wire the Electrical Components: Connect the motor to the on/off switch and plug, ensuring all wiring is insulated and safely secured.
- Test the Vacuum Cleaner: Power on the vacuum to check for proper suction and functionality, making adjustments as needed.
Gathering materials is the first and crucial step in building your DIY vacuum cleaner; make sure to have a vacuum motor, a sturdy container for collecting debris, filters, hoses, and an electrical switch ready to go. A well-thought-out selection of materials will not only enhance the efficiency of your vacuum but also ensure its durability.
Constructing the debris container involves choosing a robust and leak-proof container that will effectively hold the dirt and debris collected while vacuuming. Consider using a plastic or metal container that can withstand the suction without collapsing or breaking.
Installing the vacuum motor requires careful attention to ensure it is securely fixed to the container to prevent any air leaks. Proper alignment of the motor with the container’s opening is essential to maximize the suction power of your DIY vacuum cleaner.
Adding the filter system is vital for capturing dust and allergens, which enhances the air quality during and after cleaning. Make sure to select filters that fit well within your design and are easy to replace or clean regularly.
Connecting hoses and attachments is the next step, providing versatility for different cleaning situations. Ensure that the hoses fit snugly to prevent any loss of suction, and include various attachments to cater to different surfaces and types of debris.
Wiring the electrical components requires care; connect the motor to the switch and plug, ensuring all connections are insulated and secure to avoid any electrical hazards. Double-check all wiring before proceeding to the next step for safety.
Finally, testing your vacuum cleaner is crucial to ensure everything functions as intended. Turn on the vacuum to assess its suction power and make any necessary adjustments to improve performance and efficiency.
What Unique Benefits Do DIY Vacuum Cleaners Provide Compared to Commercial Models?
| Benefit | DIY Vacuum Cleaners | Commercial Models |
|---|---|---|
| Cost | Generally lower cost; can be made from affordable materials. | Higher upfront costs; often includes a warranty and customer service. |
| Customization | Highly customizable; users can modify features as needed. | Limited customization; features are typically fixed by the manufacturer. |
| Maintenance | Users can easily repair or replace parts themselves. | Often requires professional service for repairs; less DIY-friendly. |
| Performance | Performance may vary based on design; great for specific needs. | Generally more reliable performance; designed for various environments. |
| Weight and Portability | Can be lighter and more portable, depending on materials used. | Often heavier and less portable due to built-in features. |
| Availability of Parts | Parts can often be sourced locally or made from common materials. | Parts may require specific ordering from manufacturers; potential delays. |
| Environmental Impact | Potentially lower environmental impact; can use recycled materials. | Manufacturing processes may have higher environmental footprints. |
| User Skill Level Requirement | Requires some DIY skills; ability to troubleshoot and modify. | Designed for ease of use; minimal user skill required for operation. |
What Common Pitfalls Should You Avoid When Making a DIY Vacuum Cleaner?
When making a DIY vacuum cleaner, there are several common pitfalls to avoid to ensure your project is successful.
- Poor suction design: Failing to design an effective suction system can lead to a vacuum that doesn’t pick up debris efficiently. Make sure to select a powerful motor and appropriately sized hoses to maximize airflow and suction power.
- Inadequate filtration: Neglecting to include proper filtration can result in dust and allergens being released back into the air. Use a HEPA filter or similar high-efficiency filters to trap small particles effectively and improve air quality.
- Insufficient power supply: Using an inadequate power supply can limit the performance of your vacuum cleaner. Ensure that the motor you choose matches the power supply specifications to avoid overheating and ensure consistent performance.
- Ignoring ergonomics: Failing to consider the ergonomics of your DIY vacuum can make it uncomfortable to use. Design the handle and body for easy maneuverability and comfort to enhance user experience during cleaning tasks.
- Overlooking maintenance: Not planning for maintenance can lead to your vacuum becoming less effective over time. Design it so that filters, bags, or containers are easy to access and clean or replace regularly.
- Neglecting safety features: Ignoring safety features can create hazards while using your DIY vacuum. Incorporate features such as thermal protection or a fuse to prevent overheating and potential electrical issues during operation.
- Using inappropriate materials: Choosing the wrong materials can compromise the durability and effectiveness of your vacuum cleaner. Opt for lightweight but sturdy materials that can withstand wear and tear while ensuring the vacuum remains portable.